Do you have any extra buttons and don't know what to do with them? Well here are a few solutions. I found some DIY tutorials today using those extra bits and creating something new and pretty:)
Button Clips, Button Art, DIY Monogram, DIY Ornate Button Earrings, Button Necklace, and Button Rings
September 27, 2011
September 26, 2011
Weekend Photos
Here are a few pics from my weekend. I was super busy but I still fit in crocheting, sewing, and a little baking.
Also OMG. Lion King is coming out on DVD October 4th. I can't wait :)
Also OMG. Lion King is coming out on DVD October 4th. I can't wait :)
September 20, 2011
Lil' Trip
Over the weekend Jerry and I went to Tampa. He went to shoot a video with a friend and I hung out with Tori. We decided to go See Tim Gunn. Yes, Mr. Project Runway himself. There was a fashion show at International Mall in Tampa so we got there like an hour and a half before it started. Luckily we got some seats before they were all taken. He was a host and super informational on the new trends also what clothing flatters certain types. (Pic is by Tori)
Then afterwords Nordstroms was doing makeup so I got mine done by MAC
and got a few products:). I had my favorite tea from Teavanna, got some
Frosted Cranberry candles at Bath and Body Works (love love this scent),
did a little sewing, crocheted, spent time with the Killebrew clan, and
drove for miles.I had so much fun minus some allergy problems:(
How was your weekend?
How was your weekend?
September 15, 2011
Silver Leafing
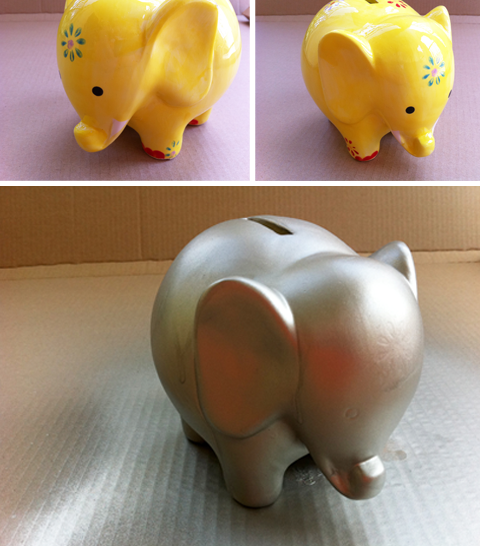
Since my last tutorial I have a lot of silver leaf left and wanted to do something with it. So I took one of my elephants and decided to revive the lil buddy :) This project was easy but a little time consuming. The silver leaf is like glitter it gets everywhere and sticks. But all in all I like the way it turned out. If you wanted to silver leaf an object here is what you will need....
Supplies:
- An object to cover
- Silver leaf sheets
- Spray paint (optional)
- Gloss Mod Podge
- Paint Brush
First I took my elephant bank and spray painted it silver. Just in case some of the yellow showed through the leaf (this is optional).
After the object was dry I painted a thin layer of Mod Podge in sections on the elephant and applied the silver leaf gently.
Once this was dry I added a complete coat of Mod Podge around the entire elephant to seal everything in. Then I waited patiently until it dried. Its that simple :)
September 13, 2011
Link Love
First and foremost I think Pinterest is so amazing. I have been completely inspired by design, fashion, decor, and DIY projects. There are so many things to look at. Another awesome site is Raverly. Raverly has free/purchasable patterns for knitting and crocheting. Lately I'm focusing on crocheting since I've been working on a few Christmas gifts. This way I'm not waiting till last minute. So here are a few lovely crochet links:)


Rawr Fingerless Gloves, Gumdrop Slouchy Hat, Artic Scarf, Zip Line Scarf, Chevy Baby Blanket, and Divine Hat


Rawr Fingerless Gloves, Gumdrop Slouchy Hat, Artic Scarf, Zip Line Scarf, Chevy Baby Blanket, and Divine Hat
Labels:
crafty tuesday,
crochet,
diy,
inspiration
September 7, 2011
Bling
A few days ago I made these super simple rings and thought I would share the tutorial:)


You will need
Clear glass gems
Silver leaf/Gold leaf (flakes or sheets)
Ring with a pad (I purchased mine at Hobby Lobby)
Decorative paper or fabric
Crazy Glue brush-on
Hot Glue gun/glue
Mod Podge dimensional magic or Mod Podge (optional)
Scissors


First cut out any shape/images you would like to show through the ring. Then put a thin layer of crazy glue on the back of the gem and place the image you previously cut face down.


Once the image has dried start gluing pieces of silver and or gold leaf to the back of the clear gem with the crazy glue. Once dry cut out a circle piece of paper/fabric to cover the entire back and glue it down.


I opted to add Mod Podge dimensional glue to the paper so its protected from water and wear but this option can be skipped. Once dry glue the ring base to the back using a hot glue gun....


and Tada you have a new ring or four :)


You will need
Clear glass gems
Silver leaf/Gold leaf (flakes or sheets)
Ring with a pad (I purchased mine at Hobby Lobby)
Decorative paper or fabric
Crazy Glue brush-on
Hot Glue gun/glue
Mod Podge dimensional magic or Mod Podge (optional)
Scissors


First cut out any shape/images you would like to show through the ring. Then put a thin layer of crazy glue on the back of the gem and place the image you previously cut face down.


Once the image has dried start gluing pieces of silver and or gold leaf to the back of the clear gem with the crazy glue. Once dry cut out a circle piece of paper/fabric to cover the entire back and glue it down.


I opted to add Mod Podge dimensional glue to the paper so its protected from water and wear but this option can be skipped. Once dry glue the ring base to the back using a hot glue gun....


and Tada you have a new ring or four :)
Subscribe to:
Comments (Atom)


